Lovense Stream Master – Steps by steps tutorial

We are happy to explain all about the new Lovense Stream Master in this step-by-step tutorial.

  • Visit the Lovense Stream Master webpage.
  • Choose the version compatible with your computer.
  • Click the button to download.

pastedGraphic.png

  • After downloading, locate the installation package on your computer and double-click to install it.

pastedGraphic_1.png

  • Once the installation is complete, a shortcut to Lovense Stream Master appears on the computer’s desktop.

pastedGraphic_2.png

  • Starting Lovense Stream Master will automatically open the login page.
  1. If you do not have a Lovense account, click “Register” to sign up.
  2. If you already have a Lovense account, log in.

pastedGraphic_3.png

Once connected, you must follow the instructions to complete three steps.

Step 1

Plug in your Lovense toy.

pastedGraphic_4.png


  • You can connect either through PC or mobile
    If you have not yet downloaded the Lovense Connect app, check “Google Play” or “App Store” to download it.
  • Open Lovense Connect on your computer or phone and connect your toy. If you are using your phone, scan the QR code on your computer screen.
  • The toy will be connected.


pastedGraphic_5.png

Step 2

  • Choose a website to stream from.
    Lovense Stream Master supports the most popular live streaming sites.

pastedGraphic_6.png

Step 3

  • Set your tip rules.
    Click to go to the settings page. You can use the default tip rules or customize your own.
    These rules can always be changed afterwards.
  • You are now ready to start broadcasting.

 pastedGraphic_7.png

Click on “Stream now“.
You will be redirected to the live streaming site you selected.

pastedGraphic_8.png

Start your live broadcast.
When you start your first live broadcast, an installation wizard will guide you through the process. Simply follow the step-by-step instructions for setup or refer to this guide.

pastedGraphic_9.png 

Selecting a broadcast scene.
Choose a scene from the available options. You can click “Check my OBS stream” to view your stream at any time.

pastedGraphic_10.png

Test the response of your toy.
Select “Send test tip” and click the “Send tip” button. Your toy will respond according to the settings in your tip menu if everything is connected correctly.

pastedGraphic_11.png

Establishing a streaming. 
The application of apps can make your show more interesting and help you earn more. Choose any app from the app gallery to get started.

pastedGraphic_12.png

You have now learned the basics of streaming with Stream Master.


~That’s all for this lesson!

Happy Camming!
Love, Your Coaching Team!
Play with Snap Camera Filters

CAM4 x SNAP CAMERA: A Brand New World of Broadcasting

When you speak – we listen! So many of you have been requesting filter and animation options for your webcams, and we found one made by the original architects of this trend – Snap Camera! From the makers of SnapChat, this FREE custom plugin allows you to apply all of those fun lenses and filters to your webcams during your broadcast!

The Snap Camera works on both PC and Mac operation systems* and downloading it is as easy as getting an app on your phone.

CLICK HERE to begin the download, and then follow a few simple, step-by-step instructions to pair the application to your camera.

After installation is complete, simply select “Snap Camera” from the Video input menu when you are setting up your broadcast. 


Keep your fans engaged and entertained by using these filters to stand out from the crowd!

Download the Snap Camera today 

RESOURCES

CAM4’s Easy-to-Follow Snap Camera Activation Instructions includes instructions on pairing with OBS and CAM4

Snap Camera User Guide

*System Requirements

  • Operating System: Windows 10 (64 bit); MacOS 10.11+
  • Hardware: Minimum of Intel Core i3 2.5Ghz or AMD Phenom II 2.6Ghz with 4 GB RAM; Intel HD Graphics 4000 / Nvidia GeForce 710 / AMD Radeon HD 6450; screen resolution of 1280×768 or higher

    ~That’s all for this lesson!

    Happy Camming!
    Love, Your Coaching Team!
Using the Lovense “Give Control” feature

The Give Control feature  brings you and your audience much closer by offering 2 new ways for viewers to control your toy through tipping on CAM4.

STEP 1: Activate the Give Control feature by setting up price and control session Duration.


STEP 2:  Now the Give Control feature appears in your tip menu.

When a tipper tips the required number of tokens, they will automatically be shown a window to control your toy with either one option below:

A. Using a slider on the screen.

B. Using a Lovense Max 2/Calor/Nora.

Get Connected… install it here  DIRECT DOWNLOAD

Recommended Toys

On Sale for CAM4 users from from our Swag Store!

CLICK HERE TO BUY YOUR CONNECTED  TOY


~That’s all for this lesson!

Happy Camming!
Love, Your Coaching Team!
 

Level UP Program

GAME ON !!!

Grab onto your joysticks and get ready to Level Up each month!

This program will have you feeling like a boss… From the 1st of each month we are challenging YOU with the opportunity to make an extra $2K+.

ACHIEVEMENT LEVELS

LEVEL 1 – $100 = $10
LEVEL 2 – $200 = $20
LEVEL 3 – $300 = $30 + Bonus CAM4 Shirt
LEVEL 4 – $400 = $40
LEVEL 5 – $500 = $50 + Bonus Creator Pack
LEVEL 6- $750 = $50
LEVEL 7 – $1000 = $100
LEVEL 8 – $1500 = $100 + Lovense Toy
LEVEL 9 – $2000 = $100
LEVEL 10 – $3000 = $200
LEVEL 11 – $4000 = $300
LEVEL 12 – $5000 = $1000

UNLOCK EACH  BONUS AS YOU GO!

The more you earn >> the more levels you unlock >> the more bonuses you collect along the way!  

Creator Pack from the Swag Store
Female Swag ($100 Value)


Male Swag ($100 Value)

Please note: The creator pack changes monthly. The swag shown in the images above does not reflect the exact products available to you. 

BUT WAIT… THERE’S MORE

As you unlock each $$$ level there are additional prizes and stretch goals that can be achieved along the way, from CAM4 Swag to LIVE TOUCH connected toys by Lovense .

BONUS ROUND
“Top Up’s”

Creators who earn $300+ can win 1 of 5 additional randomly selected  “top ups” that range between $20 – $100  each month.

Choose your destiny on your quest to beat your best score with the NEW CAM4 Level-Up Program !!!

RULES

  • Creators MUST be 2257 approved
  • Creators MUST live in North America
  • Creators MUST broadcast a min of4 hours
  • Transferring tokens between accounts is not allowed
  • Earnings are counted from 12:00am ET the first day of the month till 11:59pm ET on the last day of the month
  • Creators MUST sign up each month to take part in the program
  • Top Up’s are rewarded through random draw
  • Each Swag Store Prize can only be redeemed ONCE.
  • You can only be a part of one incentive program at a time.

Any bonuses will be credited to the creators account within the first 7 days of the following month.

What is Cam2Cam?

Cam2Cam

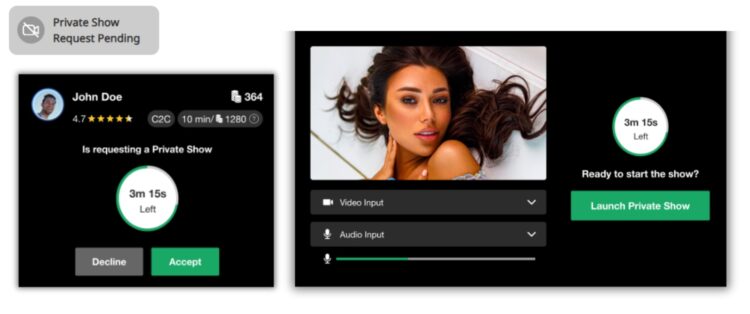
Cam2Cam is a Private Show option that allows Viewers to display their camera feed to Broadcasters

As opposed to the traditional Private Show on CAM4 where only the viewer can watch the broadcaster

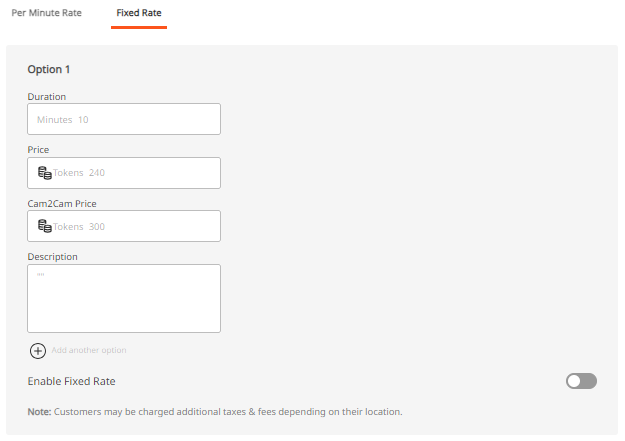
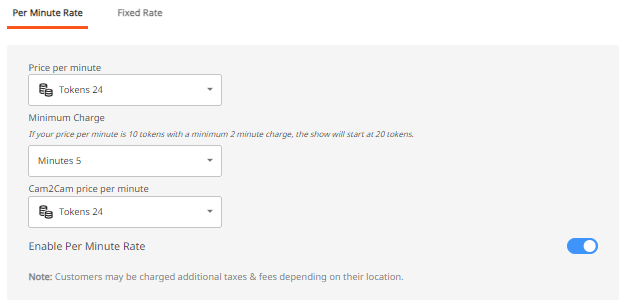
Cam2Cam offers low latency for both audio and video, with a custom price that can be different from the regular Private Show price.

Good to know:

– Cam2Cam only works if both streamer and viewer are logged in on the desktop and use the Chrome browser

– The price for Cam2Cam  per minute is typically around 1.25 times the private show price per minute

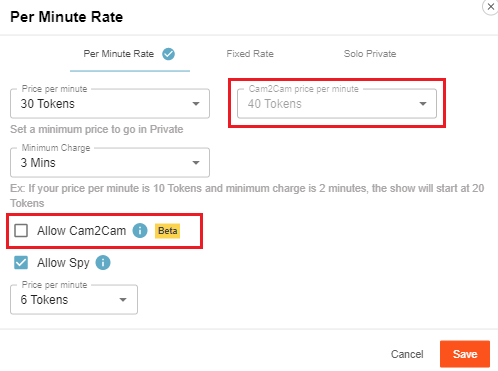
Access the private show settings by clicking on the gear icon beside the “Private Show Requests button”. You can set the price for Cam2cam shows and then add a checkmark beside “Allow Cam2Cam”  to activate the feature once you press save.


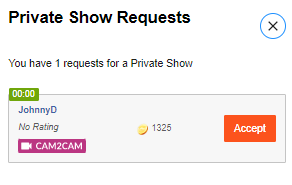
Once your viewer allows CAM4 to share their cam you will see a Private show Request. Open your requests and as you can see below they have enabled their Cam2cam for this show.


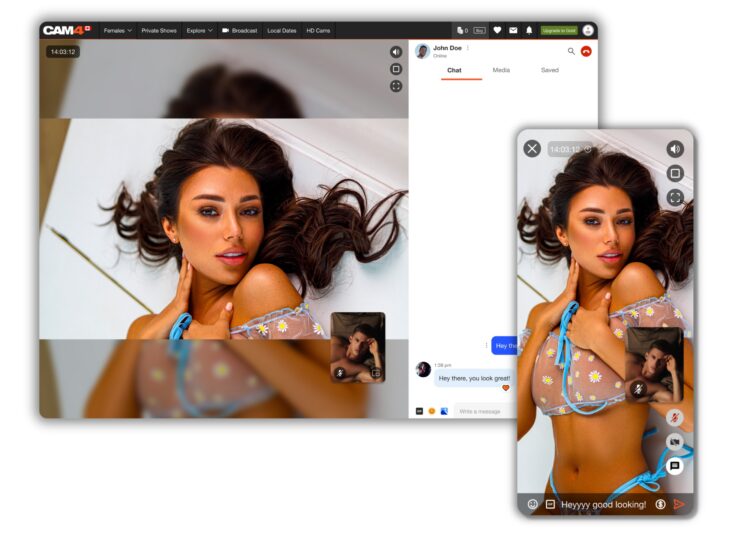
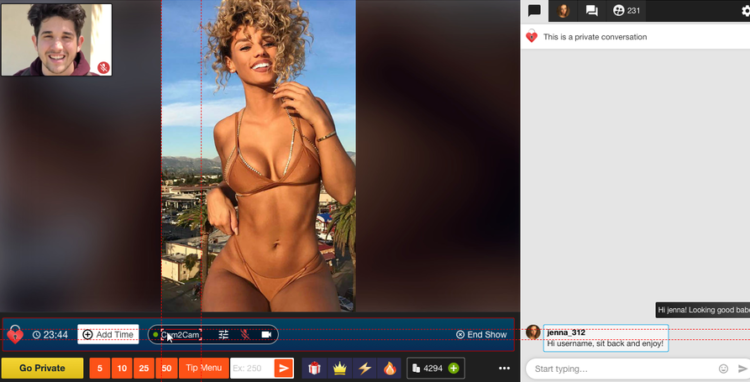
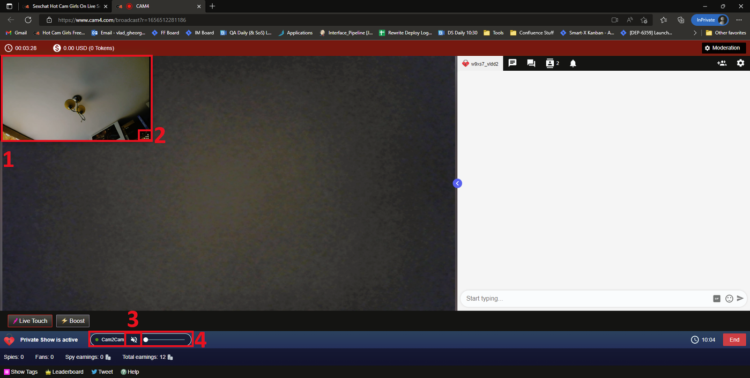
What you will see after accepting the Private Show:

  1. The Viewer’s Stream. It is displayed by default in a small rectangular shape in the top left corner of the screen

  2. The Resize Indicator which lets users know that the window is resizeable. The window also be moved anywhere on the screen

  3. Cam2Cam Controls, split in 2 elements (3 and 4). Element 3 is the “Mute Audio” button, which will mute (or unmute) the Viewer’s stream. When pressed, the icon will update to reflect this change.

  4. Cam2Cam Controls, split in 2 elements (3 and 4). Element 4 is the “Volume” slider, which allows the Broadcaster to adjust the Viewer’s volume. Its behaviour is identical to the Volume slider present on the Viewer-side video player.


Adding the Cam2cam to your Private Shows is a great way to earn more and give your viewers a more intimate experience. By keeping you on the CAM4 platform, you can trust that your experience will be not only easy, but safe and secure.


~That’s all for this lesson!

Happy Camming!
Love, Your Coaching Team!
 

How to Host a Group Show on Cam4

What is a group show?
Group shows give broadcasters a chance to have a private show with multiple viewers.

When the Group show begins, everyone who has purchased an entry ticket has access to the show and can watch, listen and chat with the broadcaster.

How much does a Group Show cost?
You can set the cost of each ticket: 10, 25, 50, 100, 150, 200, 250 or 300 tokens.

How to start a group show?

Create a group show, describe your show, define the price and duration.


Launch your “Ticket Sale” by setting a “Ticket Goal” or set a “Time Limit” if you have an large audience of viewers and hitting a ticket goal might be too easy.

Time Limit –  Once the grouped show has been created and launched, the countdown starts, you have a set amount of time to complete the sale of tickets to hit your goal.

What happens if I sold tickets and the goal is not reached?
If the predetermined goal is not reached, you can restart the countdown, so you give extra time (5 or 10 min more).

How do I modify and extend my countdown?

Click on the red “Cancel” button. You will then get a confirming the canel.


If  you have almost reached the goal, do not cancel the group show, confirm your group show in order to validate the sale of your tickets.

To confirm your group show, let the countdown end, the group show will start automatically.

However, In the event that the show is canceled for x reason, the tickets purchased by the voyeurs are refunded immediately.

How to optimize the sale of your group shows?
As soon as you broadcast:
• Add value and exclusivity to your show group. To do this, show up dressed in lingerie (no direct nude).
• Greet everyone by announcing the sale of group show tickets at 50 tokens for 15 minutes (recommended). You can always set the cost of your ticket to 10, 25, 50 or 100 tokens, and the duration to 10, 15, 20 or 30 minutes.
• ANSWER and be chatty to set the mood with your viewers by always having control of the conversations on your chat.
• STAY FOCUSED ON YOUR OBJECTIVE: ticket sales!
Important: do not let any viewers devalue your session, for that silence (or ban) the bad comments as well as the viewers who question the price of the ticket.

Why do I have to silence or ban a bad viewer immediately?
When you let viewers bash your show, you can have potential ticket buyers who hesitate and not buy tickets.

BRAVO you sold grouped show tickets!!
Tips :
• Thank the ticket buyers live, followed by the question “Who’s next, to complete the goal, so we can all go on a group show together?!”
• You can also offer private shows for those who wish.
• Make it easier and increase your chips by using your Lush Lovense (sex toy) during your group shows!!!


~That’s all for this lesson!

Happy Camming!
Love, Your Coaching Team!
Connecting a Wishlist to your Profile

Let your fans SPOIL you!

Fans are always looking for ways that they can help and spoil their favorite broadcasters. Create a Wishlist on one of these great sites and let your fans know exactly what you need!

What do I need to Do?

  1. Visit the website of one of the CAM4 supported stores listed above.
  2. Create an account on their site and use their registry or Wishlist function to start building your list.

    If you are having issues, please contact the store you are building your Wishlist on. CAM4 does not provide support these platforms.

  1. Once your list is complete copy the Registry or Wishlist URL that they provide you and go to CAM4.com.
  1. Login into your CAM4 and hover your mouse over your profile icon on the top right-hand side of the homepage. From the menu click on “My Account”.


5. Click on “Wishlist” and add the URL below the logo for the store you used and click “Save”

When you visit your profile on CAM4 you will see your wish list appear on the bottom left under you “Detailed Bio”.


To add a list for another CAM4 supported store, just repeat the process and you will see the logo linking you viewer to your list appear under “Wishlist” as well.

PRO TIP: When creating your Wishlist, DO NOT use your real name. All Wishlist will hide your mailing info but some will show the owners name when viewing the list. If you want to hide your legal identity, always use your fake name.


~That’s all for this lesson!

Happy Camming!
Love, Your Coaching Team!
 

Your Tip Menu

Launch Your Very Own Custom Tip Menu to Improve Engagement and Increase Earnings!

Tell your fans what to tip for and earn more tokens, set up yours now!

What Is It?
The CAM4 Tip Menu is a fun tool that allows you to create a customized list of actions with the corresponding token amount a viewer needs to tip for you to perform the action during your performance. We’ve recently upgraded our tipping menu functionality to allow for simple set up and easy viewer access. Performers who’ve launched their own tip menus have reported heightened activity and ultimately an increase in show earnings! 

Benefits of Creating a Tip Menu:

  • The tip menu is an easily customizable list that you control and can change / update at any time
  • Your viewers know exactly what they can tip for each performance action without having to ask
  • You won’t need to set up an HTML bio
  • The tip menu is easily accessible via your profile during every show
  • Less chatty viewers are more likely to engage

Quick & Easy Tip Menu Set Up
Locate the Tip Menu feature near the Game Center and enter each action and the required tipping amount. *Please note you must enter at least four (4) actions to activate your tipping menu for viewers

You can add up to 12 tip menu options; click the trash can icon to the right of each option to delete and update. Once you’ve completed your list, click SAVE to activate.

You will receive a special notification in your chat window every time a viewer selects an item in your tip menu


Tip Menu Ideas
What you include on your tip menu is completely up to you, and the great thing is you can add and update the menu as you learn what your viewers want and need in your shows!  Here are some sample tip menu options to get you started:

  • Blow kisses
  • Custom shout out message
  • Flash boobs
  • Oil rubdown
  • Spanking
  • Twerk
  • Insert toy for 15 seconds

Get creative here – the sky really is the limit!

The Key to Tip Menu Success
Our best advice for making the tip menu work for you is to keep your list of options fresh and creative while continuously directing viewers to it during your show.

We’re Here to Help You Win!
If you need help setting up your tip menu or are looking for ways to maximize this fun tool, please reach out to support@CAM4.com at any time and one of our experts will guide you.


~That’s all for this lesson!

Happy Camming!
Love, Your Coaching Team!
How To Start Your Broadcast

All the basics to start your broadcast: from launching the broadcast window, to how to put all the settings in place!

Step 1: Launch the Broadcast Window

Start your show by hitting ‘Broadcast’ on the CAM4 header bar (at the top of your screen) in your Dashboard or any other page on CAM4.

Please note: only ID verified broadcasters can live stream. If you are not ID verified yet you will be asked to go through this process first. 

Step 2: Select Broadcast Type 

Regular Broadcast – This is the default broadcast type for CAM4. 

External Encoder – If you have experience with external encoding software, you can use this tab to connect your external stream to CAM4. 

Learn more about External Encoding here.

Let’s have a look at what it will look like when you start Regular Streaming:

Step 3: Video / Audio Settings

It is important that you give permissions for CAM4 to use your video and your microphone. Once you give these permissions, CAM4 will detect your video and audio devices: 

You don’t have to worry about the aspect ratio of your video. This will be chosen automatically, based on the ideal proportions for your hardware.

Usually you don’t have to tinker with these settings and CAM4 will detect the right devices automatically. But here you can select your preferred video and audio input if you wish, or choose to use an external encoder like OBS. 

You can flip your image horizontally by toggling Mirror video.

Step 4: Show Details

Underneath your audio and video  settings, you will find your show details:

Category

Here you can select whether you will broadcast by yourself (Solo) or with another, verified user. Depending on your gender, you’ll be shown the options (Male-Female, Male-Male, or Female-Female). 

Select the appropriate category. 

Mode

By default this is set to public. If you are an approved CAM4 performer (2257/ID approved) then you can choose to have a password protected room. 

Step 5: Set your tags

Tags are a great way to communicate to potential viewers what to expect from your show. 

Choose tags that are appropriate to what your show is all about. This will make sure viewers will get to see what they want, and you get viewers that want to see what you want to show!

We recommend picking about 3 tags.

Step 6: Check your stream quality

Below the area where your video is shown, you’ll see information about your stream quality and FPS:

It’s useful to give these a quick glance before you start your broadcast, just to make sure that your video quality is to your viewers satisfaction.

Stream Quality
Indicates any stream issues so you can fix them before you start your broadcast. The light bulb shows troubleshooting suggestions.

FPS – Your cameras frames per second (FPS). 25-30 FPS is ideal.

When you see a low Stream quality and/or FPS, it may be worthwhile to do a speedtest and/or a reset of your router. 

Step 7: Go Live!

Once your settings are correct you can go live and start your show!


~That’s all for this lesson!

Happy Camming!

Love, Your Coaching Team!


CAM4 Cupid (FEB 12th – 16th 2025)

CAM4 CUPID IS BAAAAAACK !!!

From Feb 12th – 16th … CAM4 Cupid will shoot his arrow at all the sexy Valentine shows he can find boosting your position up on our directory page!!

HOW CAN YOU GET CAM4 CUPID TO VISIT YOUR ROOM !

  1. Perform a Valentine themed show between Feb 12 – 16th, 2021

  2. Tag the show #Cam4Cupid and #Cam4vday

  3. Tag #Cam4vday and #Cam4Cupid on Twitter when your themed show is live

We can’t wait to see all the sexy themes that you come up with.

Read more here about our BOOST feature.