Privacy
Protect yourself and your income: simple, practical tips for online safety that you can apply today.
Online safety: simple tips for everyone
Working online is great: you choose your own hours and you’re your own boss. Protect yourself and your income at the same time with these practical basics.
Tip: make safety part of your routine — small habits, big effect.
Passwords and 2FA
Strong passwords
- Make them long (at least 12 characters).
- Mix letters, numbers and symbols.
- No personal info (social security number, date of birth, PIN).
- A different password for each site.
Two-step verification (2FA)
- Turn on 2FA for your most important accounts.
- Preferably use an authenticator app.
- Store backup codes safely (not in your email).
Phishing and suspicious links
Don’t fall for fake emails
- Real companies never ask for your password via email/DM.
- Don’t click on “log in here” links from messages.
- Are you in doubt? Go to the website yourself and log in there.
Watch out where you click
- Don’t open unknown links, files or photos.
- Also pay attention in Skype/WhatsApp and other chat apps.
- Stay within the platform where possible.
Recognizing scams
Too good to be true
- “Free money”, “super fast opportunities”, “exclusive deals” = usually scams.
- Ignore and delete. Do not respond.
Privacy: what you never share
Keep it private
- Don’t put your real name on screen.
- Don’t share photos/videos of family or children.
- Remove location data from photos (turn off location on your phone/camera).
Separate work and private
- Use a stage name.
- Use a separate email address and (where possible) separate phone number.
- Never share your real name or address — not even with other models; keep it professional.
Physical safety
What you show
- Use a neutral background; no documents or outside view in the picture.
- Avoid recognizable places, license plates or unique furniture.
Location & mail
- Don’t share your location or schedule live.
- Preferably use a PO box for mail.
Mental well-being and boundaries
Boundaries
- Set clear rules (what you do/don’t do).
- Block or mute anyone who crosses your boundary — without feeling guilty.
Self-care
- Take breaks. Sleep and eat well.
- Talk to someone if something is bothering you.
Collaboration and consent
Clear agreements
- Only work with adults (18+).
- Discuss in advance what is/is not okay. “Yes is yes, no is no.”
- Record agreements briefly (chat/message). Do not share data from others.
Quick checklist: strong passwords + 2FA on, never click on login links from messages, don’t share private info/location, separate work and private, keep boundaries — and update your security settings regularly.
Cam Setup, Lightning and Internet
Small tweaks, big difference: with a smart cam setup, good lighting, and stable internet, your show immediately looks more professional.
Cam Setup, Lighting & Internet — How to Improve Your Show
Authenticity sells: you don’t need a studio. With a few smart adjustments, your stream immediately looks and feels better for fans.
Tip: test shortly before you go live (cam, light, sound, upload speed) and adjust if necessary.
Cam Setup
Keep it Real
Viewers don’t want an ultra-polished TV show, but a pleasant, stable experience. Simple = effective.
Background
Remove personal items (family photos, papers, addresses). Quiet decor = nicer viewing + better privacy.
Cam Placement
Camera at eye level, neat framing. Do a quick test to see if you are well in the picture and lit.
Lighting & Sound
Lighting
- Use multiple light sources for even light.
- Soft, warm ambiance — not too dark.
- Light behind the camera, not behind you (avoid silhouette).
- Same color temperature (e.g., all warm white).
- Reflect light off wall/ceiling for soft look.
Sound
- Test your microphone before you go live.
- Simple USB microphone > built-in laptop mic.
- Minimize background noise (TV, traffic, housemates).
Internet & Connection
Speed & Stability
Check upload via speedtest.net (upload is more important than download).
- 600–800 kbps = low quality possible
- 1.5 Mbps = average quality
- 4 Mbps+ = high quality (HD)
Practical
- Wired if wifi is not stable.
- Close unnecessary apps, give your stream the bandwidth.
- Troubleshoot: refresh stream; limit other devices (phone/tablet/smart TV) on wifi.
Practicing & Testing Before You Go Live
Practice Safely
First try in a safe setting how camera, light, and sound work together.
Pre-Live Checklist
- Short test run with cam, light, and audio.
- Also view your show on mobile (many fans watch via phone).
- Adjust position or lighting where necessary.
Privacy & Safety • Comfort
Privacy & Safety
- Remove documents/mail/photos from view.
- Check mirrors/windows for reflections.
- Use room divider or move the cam if in doubt.
Comfort for Yourself
- Have a drink ready.
- Make sure you are sitting/lying comfortably (less shifting).
- Keep the room temperature pleasant (especially for longer shows).
In short: keep your setup simple but thoughtful, choose warm, soft lighting, check your upload, pay attention to sound and privacy, and make sure you are comfortable. Practice offline if necessary — this makes your show feel real, look good, and run smoothly for your fans.
Offline Private shows Setup
Never miss a private show request again: with Offline Private Show (OPS) notifications, fans can book at any time and you choose how you are alerted.
Offline Private Show (OPS) Notifications on CAM4
Receive private requests when you are offline, show your availability, set your rates, and choose notification channels: browser, app, email, or SMS.
Tip: activate multiple channels at the same time and put your calendar visibly on your profile for more bookings.
What is OPS and Why Use It?
With OPS, viewers can always make private show requests and view your schedule — you get notifications on the channels you choose. Perfect for keeping your audience engaged, even outside your regular show times.

Notification Preferences
Personalize real-time notifications per channel: Browser, C4 Broadcaster App, Email, and SMS.
Personal Rates
Determine your Private Rates, set up Cam2Cam and Spying as you want.
Visible Calendar
Publish up to 3 time slots; your schedule appears directly on your profile and in Messenger.

Setting Up OPS: How to Find the Options
Log in, click on MENU (top right) → Performer Dashboard → Private Show Settings.

Important: OPS notifications are set to OFF by default. Set the switch to ON to activate.

Notification Channels
Browser Notifications
Pop-ups on your screen as long as your browser (Safari, Firefox, Chrome) is open. Set “Browser Notifications” to ON.
iOS Users: add the web app to your home screen and open it from there to receive notifications.
- Go to CAM4.com in your browser.
- Click on the download icon and choose “Add to Home Screen”.

- Rename (optional) and confirm “Add”.

C4 Broadcaster App
Receive push notifications on your phone via the C4 Broadcaster App. Set “C4 Broadcaster” to ON in your OPS settings.
Email Notifications
Keep a record in your inbox. In your email preferences, set “Receive notifications about your CAM4 account” to ON.

SMS Notifications
Receive an SMS with each private request. Add your mobile number in the settings.
Note: if 2FA is enabled, your SMS number must match the 2FA number.

Price Settings for Private Shows
Set your prices as you want: per minute or as a fixed rate. Configure “Price Per Minute”, “Minimum Time Limit”, “Spy Per Minute Rate”, and “Cam2Cam”.


3 Useful Tips
- Receive multiple notifications: activate more than one channel so you are always reached.
- Adjust your availability: set time slots open when you accept private requests.
- Show your schedule on profile & Messenger: increase the chance that fans will book when you are free.

With the right settings, your private show flow becomes more organized, responsive, and profitable.
GroupShows
Give an exclusive group show on CAM4: sell tickets, start on time, and stream only for paying viewers.
Group Shows on CAM4
A group show is an exclusive show for which viewers buy a ticket. Only ticket buyers see your stream — ideal for guaranteed, paying viewers.
Tip: announce your group show in advance and start no later than ~15 minutes after your intro.
What is a Group Show?
You sell tickets to viewers who want access. So it’s one performer for a group of paying viewers (not: multiple performers at the same time). Announce in time what happens in the show; the countdown shows when you start.

How to Set Up Your Group Show
Settings in the Menu
- Description: what can viewers expect?
- Ticket price: your fixed price per access.
- Minimum number of tickets for passage.
- Duration of the show.
- Countdown: how long people can still buy tickets.
Interface
Find the Group Show options in your broadcast screen and set them as desired.
Don’t you sell the minimum? You can still start. If you don’t start, buyers will automatically get their tokens back.
Price & Expectations
Transparency to Viewers
The price viewers pay is higher than your token earnings; in many regions, VAT is added on top of that. Take this into account when setting your ticket price.
Regional differences (VAT/fees) are possible; viewers see a cost indication before purchase.
Quick Tips for Success
Tease & Announce
Use your Activity Feed to tease the show and mention time, duration, and highlights.
Clear Promise
Clearly describe what you are going to do. Clarity increases conversion.
Thank Buyers
Mention ticket buyers audibly/visibly and start on time to maintain trust.
Adding shows into your Calender
Let fans know when you go live: schedule your shows in your CAM4 calendar, gather followers, and increase the chance they’ll return.
Plan your shows with the CAM4 calendar
Fans can subscribe to your calendar via your profile and get a notification as soon as you go live. Easy to stay in touch, more returning viewers.
Tip: put themes, guests, and hashtags (#footfetish, #dominatrix) in your description for extra visibility.
Why planning works
Predictability
Fans know exactly when you’re live and can set a reminder.
More reach
Notifications to profile followers increase the chance they’ll return.
Flexible schedule
Plan up to 90 days in advance, a maximum of 5 shows per week.
How to schedule a show
Log in to CAM4 and open your Avatar in the top left → Calendar. You’ll see your calendar, how many fans receive updates, and the “NOW” option.
Then the screen opens where you can schedule your show. Fill in:
- Date — first month, then day, then year.
- Start time — when does your show start?
- Duration — how long will you broadcast?
- Description — pitch your show: what can fans expect (theme, guest, goal)?
Click “Schedule New Broadcast” to confirm your scheduled show.
Make your announcement stronger
What do you mention?
- Show type (tease, games, group show, private focus).
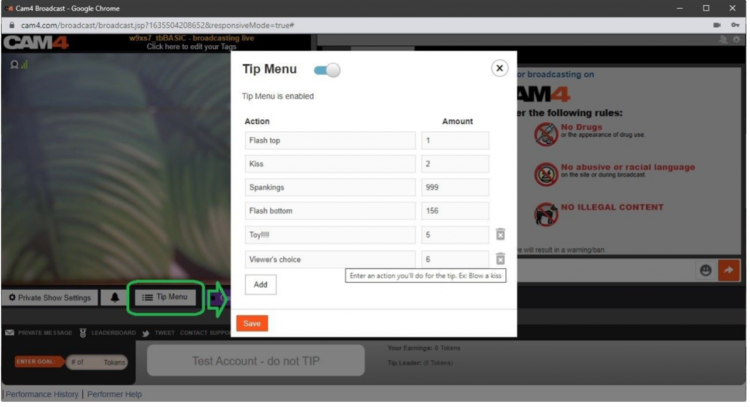
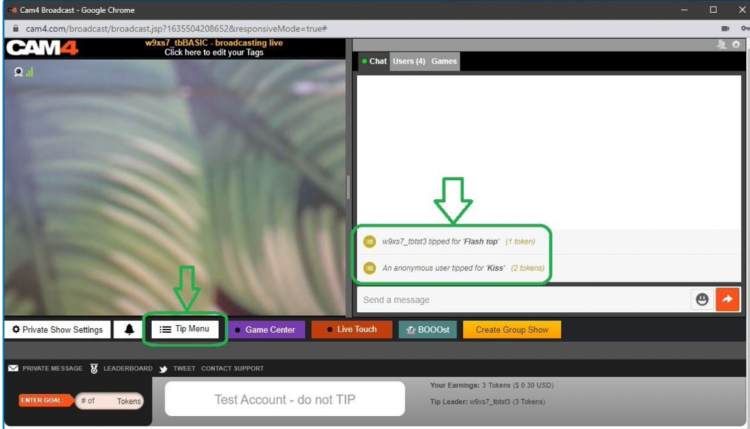
- Goals or Tip Menu highlights (e.g. 25/50/150 tokens).
- Hashtags for discoverability (#cam4, #liveshow + niche).
Timing
- Schedule shows at fixed times (rhythm = recognition).
- Post a reminder in your Activity Feed the same day.
- Afterwards: thank you post with highlight (build loyalty).
Pro tip: announce special shows (guest/theme) a few days in advance and pin the post to the top of your Feed.
Lovense Toys
Connect Lovense toys to CAM4
Make your show more engaging and increase your tips: with every tip, your toy reacts directly — you determine the intensity per threshold.
Tip: Put your thresholds (e.g. 25 / 50 / 150 tokens) clearly in your description or Tip Menu.
Interactive toys make your shows more dynamic and give viewers direct feedback. You control the experience — they remember it.
Please note: Live Touch / FeelConnect is not suitable for Lovense. Always use the official Lovense software.
Lovense integration
Lovense works great with CAM4. Use the Lovense Browser Extension or Lovense Stream Master to sync tips with your toy.
Step-by-step
- Update Lovense app and firmware.
- Install the extension or Stream Master.
- Connect your toy.
- Make a test tip (small amount).
Tips for the show
- Link thresholds to intensity or duration (e.g. 25 / 50 / 150 tokens).
- Pin your thresholds visibly and repeat them aloud.
- Use goals and your Tip Menu for rhythm and transparency.
Multiple toys
You can use multiple Lovense toys at the same time. Test combinations in advance and keep an eye on battery status.
Supported models (selection, 2025)
Vibrators & wearables
- Lush 4, Lush Mini, Lush 3
- Ferri (panty vibrator)
- Ambi, Exomoon (bullet / lipstick)
- Mission 2, Osci 3, Dolce, Flexer
- Tenera 2 (clitoral suction)
Rabbit & G-spot
- Nora (all generations)
- Lapis (strapless strap-on)
Masturbators
- Max 2 (and older Max)
- Calor
- Solace / Solace Pro
Prostate & penis
- Edge 2 (and older Edge)
- Gush 2 (and older Gush)
- Diamo (cockring)
Anal / Wands / Specials
- Hush 2 (all sizes), Hush (older gen.)
- Domi 2 (and older Domi), Gravity, Hyphy
- Gemini (nipple)
- Lovense Sex Machine (mini & full)
Disclaimer: This list is a selection. Compatibility may change due to new firmware or models. Always consult the official
Lovense website for the most up-to-date information.
Best practices
Test in advance
Test connection, intensities and thresholds before you go live. Have a short demo tip ready to let your audience experience the effect.
Communicate clearly
Keep thresholds short and visible. Repeat them to newcomers and thank them for each trigger (name + what happens).
Boundaries & rules
Stay within your comfort zone and CAM4 rules. Set time-outs or cooldowns if you want to control the pace.
Quick recap: Always use Lovense software (extension or Stream Master), test in advance, set clear thresholds and communicate them. Update apps and firmware, and keep batteries ready. Consistency creates better experience and more tips.
Token Indicators + user badges
Get direct insight into who’s in your room: with the CAM4 Token Indicator you recognize big tippers, read the chat smarter and steer your show more effectively.
More insight with the CAM4 Token Indicator
See at a glance who recently tipped, recognize big spenders and focus your energy where it pays off — directly in your chat.
Tip: link your goals and Tip Menu to what your “colored” viewers show for maximum conversion.
What is the Token Indicator?
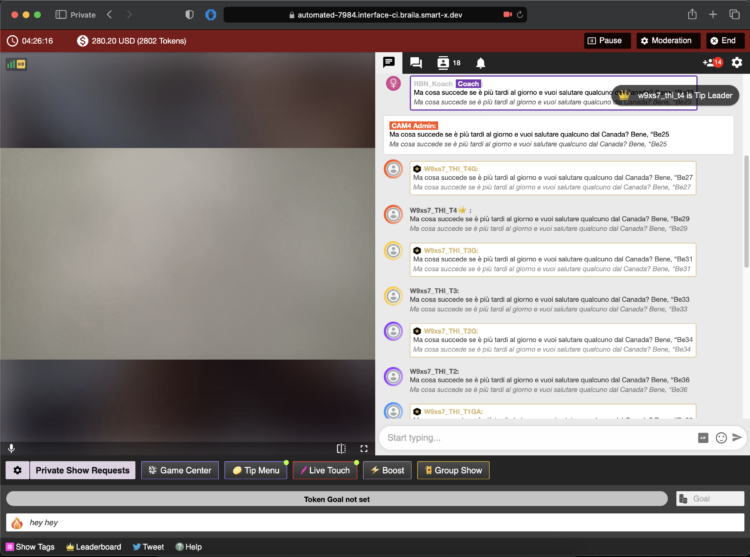
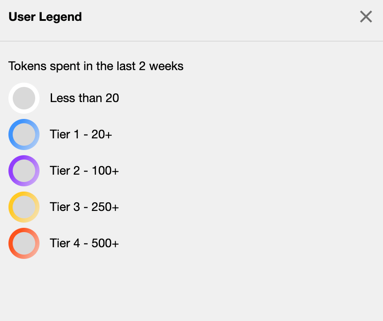
The Token Indicator shows in your CAM4-chat how much a viewer has spent in the last 14 days.
Color-coded names and badges (such as GOLD, Fanclub or Moderator) help you quickly assess how involved someone is.
Colors based on spending
Everyone in your chat gets (if applicable) a color based on tokens spent in the last 14 days.

Whatever color you see — greet these viewers warmly and involve them in your goals. Often regular visitors are your next top tippers.
Badges and roles in the chat
In addition to colors, you see different icons and labels. This way you know directly who is speaking:
Token icon
Indicates that a viewer currently has tokens available.
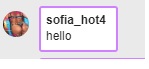
Your messages
This is what your chat messages look like as a creator during the broadcast.
GOLD member
Viewers with a Gold subscription and extra features. Their status is independent of their token balance.
Moderator
Helpers you designate with tools like mute, kick and ban (only in your room).
Regular member
A registered CAM4 user without a Gold subscription.
Admin (CAM4 Crew)
Official CAM4 staff who provide support and oversee the rules. They never ask for your password.
Coach (CAM4 Crew)
Selected CAM4 coaches who support creators and provide training.
Smart use of newcomers
![]()
You immediately see when someone enters your room (like this example of a Gold member). Use that info wisely: greet new “colored” viewers, link your goals (“120 more to Goal 2”) and highlight 1–2 popular Tip Menu items. This increases your chance of tips — without pushing.
Pro tip: have a few short sentences ready to name thresholds (“80 more to Goal 1”), thank them for each unlock and name 1–2 menu-suggestions (e.g. 25/50/150 tokens).
What is SFW
SFW profile photos: why they’re essential for your visibility and earnings on CAM4.
SFW Profile Photos: Maximum Visibility, Maximum Earnings
A Safe For Work (SFW) profile photo is the key to worldwide visibility. Without an SFW photo, you remain invisible in important markets and search engines.
SFW means: sexy and attractive, but not explicit. Suitable for all platforms and search engines.
What Does SFW Mean?
SFW stands for Safe For Work. This means your profile photo is suitable to be shown anywhere online — including on platforms and search engines with strict content rules.
SFW photo = sexy and attractive, but not explicit.
Think of it as an advertising photo: enticing enough to attract attention, but safe enough not to be blocked anywhere.
Why Is an SFW Photo So Important?
Very simple: no SFW photo means less visibility — and therefore less income.
Invisible in Many Countries
Without an SFW profile photo, you won’t be shown in search results in countries like the US, Canada, Australia, and large parts of Europe.
Blocked by Search Engines
Search engines block profiles without an SFW photo. This means you miss out on traffic from people actively searching online.
Stricter Regulations
Platforms must comply with international regulations. An SFW photo protects your own visibility.
What Is a Good SFW Photo?
✅ This Is Allowed
- Swimsuit, lingerie, or bikini
- Provocative pose, but fully clothed
- Close-up of your face (optional)
- Full body photo in a nice outfit
- Suggestive close-up without explicit details
- Good lighting and clear quality
Tip: A photo that’s just too explicit can often be made SFW with smart cropping.
❌ This Is Not Allowed
- Full nudity (visible breasts or genitals)
- Sexual acts
- Toys in use
- Underwear where everything is visible
- Extreme close-ups of intimate body parts
Do You Have to Show Your Face?
No. You don’t have to be recognizable. Many models choose, for example:
From Behind
Body photo without face
Accessories
Hat, sunglasses, or shadow
Partially
Face partly out of frame
Focus on Body
Full body photo without face
As long as your photo is SFW, you are visible worldwide.
Examples of Good SFW Photos
- A stylish dress or lingerie set
- Swimsuit photo by the pool or beach
- Artistic photo with beautiful lighting
- Sexy pose, but fully clothed
- Close-up of lips, shoulders, or neck
Summary
✅ With SFW Photo:
- Visible worldwide
- More viewers
- More income
❌ Without SFW Photo:
- Invisible in many countries
- No viewers
- No income
It’s really that simple: upload a good SFW photo today and immediately expand your reach.
Lovense Stream Master & Browser Extension
Quickly learn how to use your Lovense toys in your CAM4 shows — via Stream Master or with the Browser Extension.
Lovense Integration on CAM4
Choose what suits your setup: Lovense Stream Master (all‑in‑one) or the Lovense Browser Extension (Chromium). Let your toy react to tips and enhance the experience.
Tip: communicate clear thresholds (e.g. 25/50/150 tokens) and test a small “tip‑demo” before you go live.
Two ways to connect
Lovense Stream Master
All‑in‑one software/browser from Lovense, designed for live streamers. Combines streaming, cam/browser‑integration and toy‑linking in one tool — fewer separate parts needed.
Lovense Browser Extension
Extension for Chromium‑browsers (Chrome/Edge/Brave) that passes tip‑events to your Lovense‑toy, so it reacts in realtime to tips during your stream.
Key benefits
Less hassle
With Stream Master you don’t have to work separately with OBS + separate browser + extension; many functions are built in.
Direct response
The (Cam) Extension forwards tips to Lovense, so your toy vibrates or responds to agreed thresholds/amounts.
Stability
Stream Master is the recommended route and replaces the older “Lovense Browser + extension” mode for a smoother experience.
Disadvantages & points to note
- The older “Lovense Browser with extension” will no longer receive updates since September 1, 2023 — Stream Master is recommended.
- Always use Lovense Connect to pair your toy (the Remote‑app does not work for this).
- The Extension works well on Chromium‑browsers; support on Firefox/Safari is limited/not available.
- Performance may vary: high resolution + multiple apps can cause lag/crash/delay on weaker PCs. Test your setup.
Setup (short steps)
- Install Lovense Connect on your phone and pair your toy via Bluetooth in that app.
- Download/install Stream Master (or choose the Browser Extension in a Chromium‑browser).
- In Stream Master: add your cam‑site and set up video/overlays/toy‑integration.
- If you use the Extension? Install the correct extension, open the extension page before you start streaming.
- Do a test‑tip (small amount) to check if your toy reacts exactly as you expect.
Best practices
Test in advance
Update firmware/apps, check battery/connection and show a short demo‑tip to your chat to “learn” the thresholds.
Communicate thresholds
Keep your mapping simple (e.g. 25/50/150 tokens = light/medium/intense response) and pin them visibly in your description or Tip Menu.
Disclaimer & current info
Please note: Lovense regularly releases updates (firmware/software/compatibility). Experiences vary per hardware and internet. Always consult the official Lovense‑manuals and release notes before you go live.