Category Archives: Broadcasting

Successful webcam modeling starts with successful broadcasting! This section gives tips for setting up your room – on CAM4 and in real life.

Token Indicators

More insight in what your viewer might spend 
As a Broadcaster on CAM4, it’s always good to keep track of your tippers spending behavior to prioritize your attention during a live show. Get ready to see just how big of a spender your viewers may be with the brand new Token Indicator. Conveniently integrated within your CAM4 chat, this tool now allows you to identify viewers tipping habits !


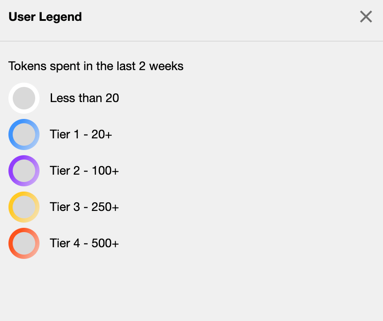
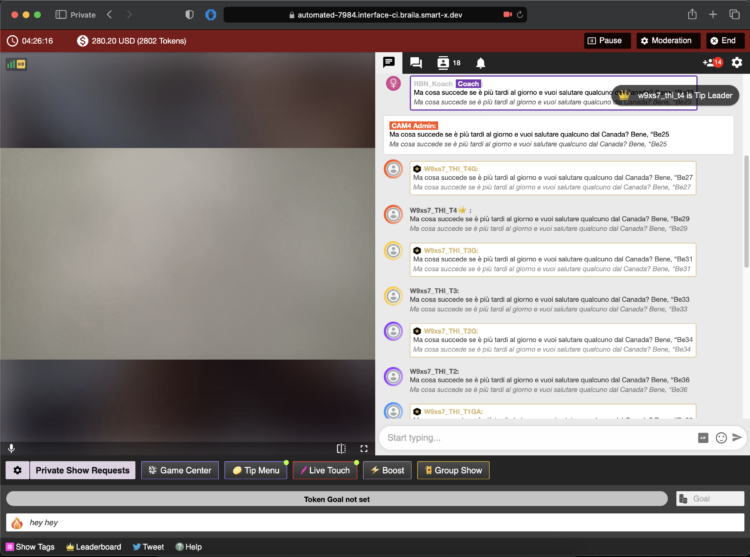
Viewers in your chat will be indicated by color coded usernames representing 5 different token tiers alongside their corresponding viewer type (Gold Member, Fanclub Subscriber, Moderator) showing you what they have spent in tokens over the last 2 weeks


TIER 1: WHITE = Has not spent any tokens in the past 2 weeks

TIER 2: BLUE = Has spent at least 1 token but not more than 19 in the past 2 weeks

TIER 3: PURPLE = Has spent at least 20 tokens but not more than 99 in the past 2 weeks

TIER 4: YELLOW = Has spent at least 100 tokens but not more than 500 in the past 2 weeks

TIER 5: ORANGE = Has spent at least 500 tokens in the past 2 weeks

THIS IS WHAT YOU WILL SEE…


Whether they are blue, purple, yellow, or orange, be sure to show them some extra love and attention while visiting your room. You never know when a regular viewer may become your next big tipper !!! 

~That’s all for this lesson!

Happy Camming!
Love, Your Coaching Team!

Lovense Stream Master – Steps by steps tutorial

We are happy to explain all about the new Lovense Stream Master in this step-by-step tutorial.

  • Visit the Lovense Stream Master webpage.
  • Choose the version compatible with your computer.
  • Click the button to download.

pastedGraphic.png

  • After downloading, locate the installation package on your computer and double-click to install it.

pastedGraphic_1.png

  • Once the installation is complete, a shortcut to Lovense Stream Master appears on the computer’s desktop.

pastedGraphic_2.png

  • Starting Lovense Stream Master will automatically open the login page.
  1. If you do not have a Lovense account, click “Register” to sign up.
  2. If you already have a Lovense account, log in.

pastedGraphic_3.png

Once connected, you must follow the instructions to complete three steps.

Step 1

Plug in your Lovense toy.

pastedGraphic_4.png


  • You can connect either through PC or mobile
    If you have not yet downloaded the Lovense Connect app, check “Google Play” or “App Store” to download it.
  • Open Lovense Connect on your computer or phone and connect your toy. If you are using your phone, scan the QR code on your computer screen.
  • The toy will be connected.


pastedGraphic_5.png

Step 2

  • Choose a website to stream from.
    Lovense Stream Master supports the most popular live streaming sites.

pastedGraphic_6.png

Step 3

  • Set your tip rules.
    Click to go to the settings page. You can use the default tip rules or customize your own.
    These rules can always be changed afterwards.
  • You are now ready to start broadcasting.

 pastedGraphic_7.png

Click on “Stream now“.
You will be redirected to the live streaming site you selected.

pastedGraphic_8.png

Start your live broadcast.
When you start your first live broadcast, an installation wizard will guide you through the process. Simply follow the step-by-step instructions for setup or refer to this guide.

pastedGraphic_9.png 

Selecting a broadcast scene.
Choose a scene from the available options. You can click “Check my OBS stream” to view your stream at any time.

pastedGraphic_10.png

Test the response of your toy.
Select “Send test tip” and click the “Send tip” button. Your toy will respond according to the settings in your tip menu if everything is connected correctly.

pastedGraphic_11.png

Establishing a streaming. 
The application of apps can make your show more interesting and help you earn more. Choose any app from the app gallery to get started.

pastedGraphic_12.png

You have now learned the basics of streaming with Stream Master.


~That’s all for this lesson!

Happy Camming!
Love, Your Coaching Team!

Play with Snap Camera Filters

CAM4 x SNAP CAMERA: A Brand New World of Broadcasting

When you speak – we listen! So many of you have been requesting filter and animation options for your webcams, and we found one made by the original architects of this trend – Snap Camera! From the makers of SnapChat, this FREE custom plugin allows you to apply all of those fun lenses and filters to your webcams during your broadcast!

The Snap Camera works on both PC and Mac operation systems* and downloading it is as easy as getting an app on your phone.

CLICK HERE to begin the download, and then follow a few simple, step-by-step instructions to pair the application to your camera.

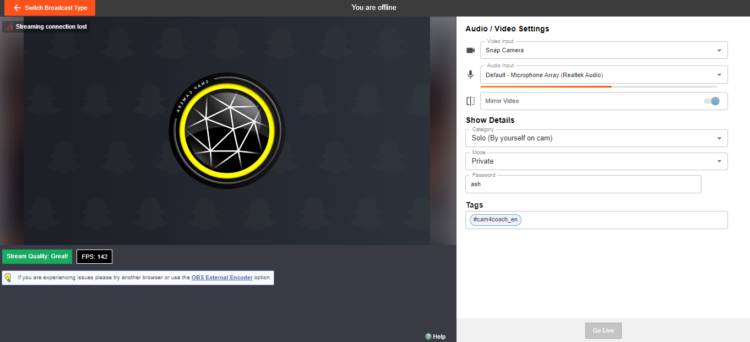
After installation is complete, simply select “Snap Camera” from the Video input menu when you are setting up your broadcast. 


Keep your fans engaged and entertained by using these filters to stand out from the crowd!

Download the Snap Camera today 

RESOURCES

CAM4’s Easy-to-Follow Snap Camera Activation Instructions includes instructions on pairing with OBS and CAM4

Snap Camera User Guide

*System Requirements

  • Operating System: Windows 10 (64 bit); MacOS 10.11+
  • Hardware: Minimum of Intel Core i3 2.5Ghz or AMD Phenom II 2.6Ghz with 4 GB RAM; Intel HD Graphics 4000 / Nvidia GeForce 710 / AMD Radeon HD 6450; screen resolution of 1280×768 or higher

    ~That’s all for this lesson!

    Happy Camming!
    Love, Your Coaching Team!

Using the Lovense “Give Control” feature

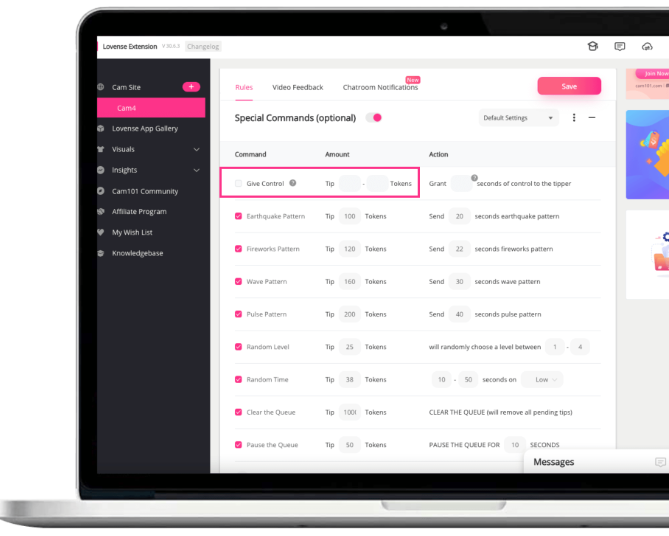
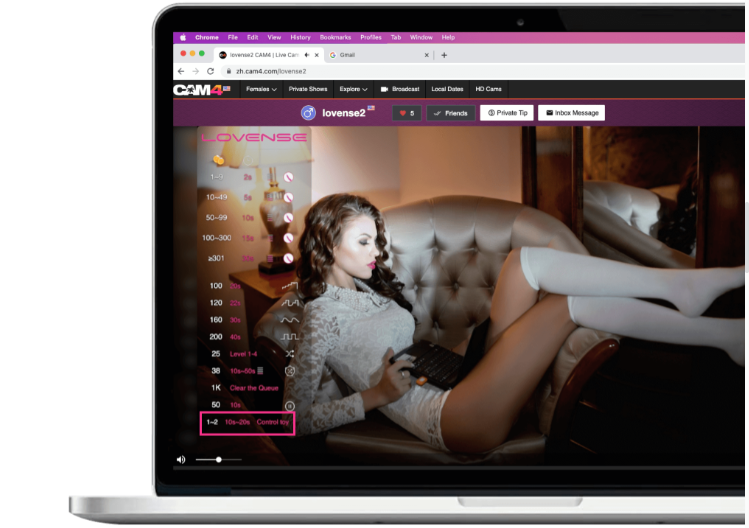
The Give Control feature  brings you and your audience much closer by offering 2 new ways for viewers to control your toy through tipping on CAM4.

STEP 1: Activate the Give Control feature by setting up price and control session Duration.


STEP 2:  Now the Give Control feature appears in your tip menu.

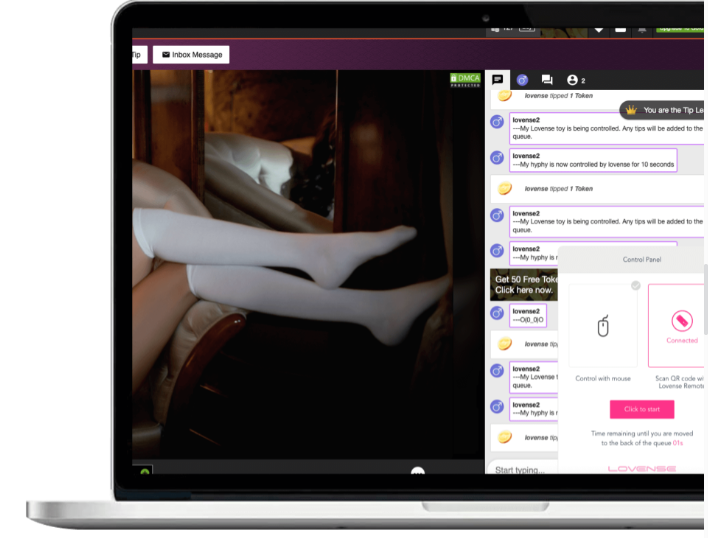
When a tipper tips the required number of tokens, they will automatically be shown a window to control your toy with either one option below:

A. Using a slider on the screen.

B. Using a Lovense Max 2/Calor/Nora.

Get Connected… install it here  DIRECT DOWNLOAD

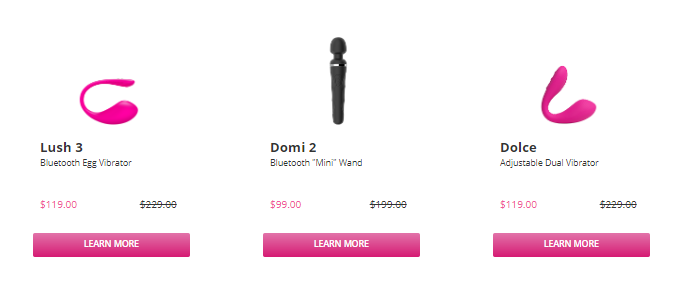
Recommended Toys

On Sale for CAM4 users from from our Swag Store!

CLICK HERE TO BUY YOUR CONNECTED  TOY


~That’s all for this lesson!

Happy Camming!
Love, Your Coaching Team!


What is Cam2Cam?

Cam2Cam

Cam2Cam is a Private Show option that allows Viewers to display their camera feed to Broadcasters

As opposed to the traditional Private Show on CAM4 where only the viewer can watch the broadcaster

Cam2Cam offers low latency for both audio and video, with a custom price that can be different from the regular Private Show price.

Good to know:

– Cam2Cam only works if both streamer and viewer are logged in on the desktop and use the Chrome browser

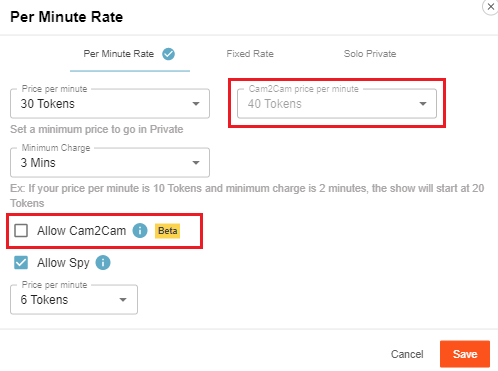
– The price for Cam2Cam  per minute is typically around 1.25 times the private show price per minute

Access the private show settings by clicking on the gear icon beside the “Private Show Requests button”. You can set the price for Cam2cam shows and then add a checkmark beside “Allow Cam2Cam”  to activate the feature once you press save.


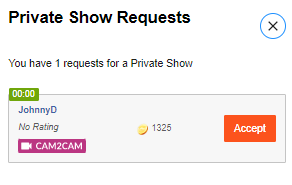
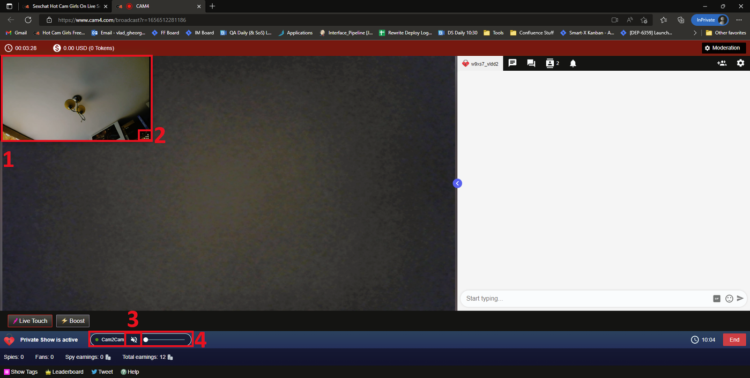
Once your viewer allows CAM4 to share their cam you will see a Private show Request. Open your requests and as you can see below they have enabled their Cam2cam for this show.


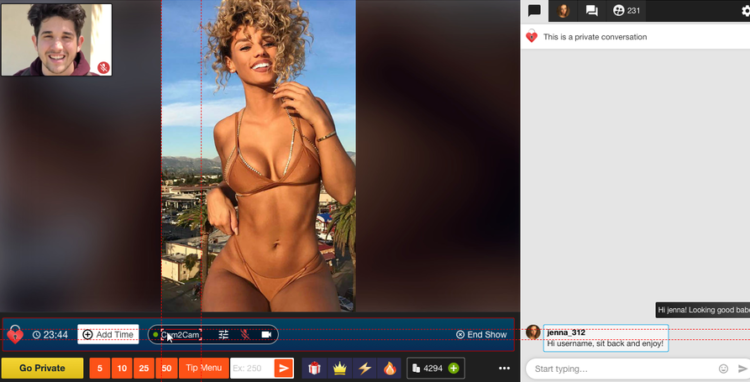
What you will see after accepting the Private Show:

  1. The Viewer’s Stream. It is displayed by default in a small rectangular shape in the top left corner of the screen

  2. The Resize Indicator which lets users know that the window is resizeable. The window also be moved anywhere on the screen

  3. Cam2Cam Controls, split in 2 elements (3 and 4). Element 3 is the “Mute Audio” button, which will mute (or unmute) the Viewer’s stream. When pressed, the icon will update to reflect this change.

  4. Cam2Cam Controls, split in 2 elements (3 and 4). Element 4 is the “Volume” slider, which allows the Broadcaster to adjust the Viewer’s volume. Its behaviour is identical to the Volume slider present on the Viewer-side video player.


Adding the Cam2cam to your Private Shows is a great way to earn more and give your viewers a more intimate experience. By keeping you on the CAM4 platform, you can trust that your experience will be not only easy, but safe and secure.


~That’s all for this lesson!

Happy Camming!
Love, Your Coaching Team!


How To Start Your Broadcast

When you start your broadcast, you will be asked to enter a few basic details about your show. These will make it easier for your fans to know what to expect.

In this article we’ll cover all the basics to start your broadcast: from launching the broadcast window, to how to put all the settings in place!

Step 1: Launch the Broadcast Window

Start your show by hitting ‘Broadcast’ on the CAM4 header bar (at the top of your screen) in your Dashboard or any other page on CAM4.
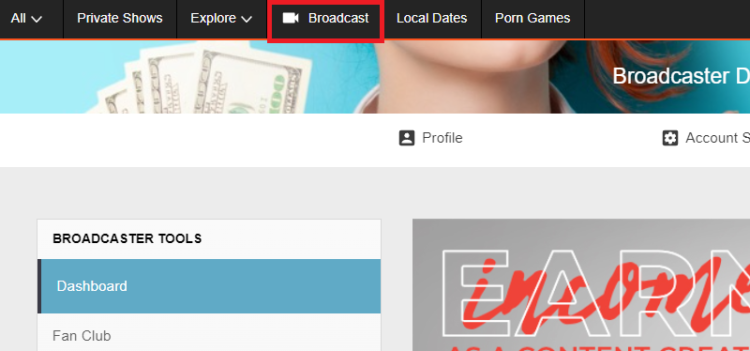
Please note: only ID verified broadcasters can live stream. If you are not ID verified yet you will be asked to go through this process first. 

Step 2: Select Broadcast Type 
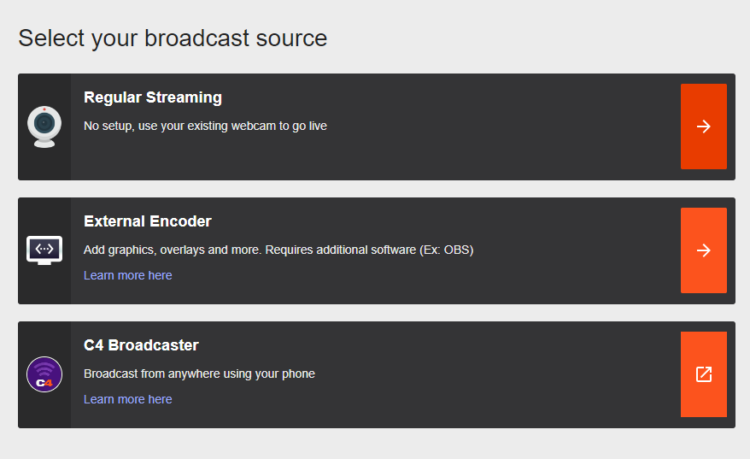
Regular Broadcast – This is the default broadcast type for CAM4. 

External Encoder – If you have experience with external encoding software, you can use this tab to connect your external stream to CAM4. 

Learn more about External Encoding here.

Let’s have a look at what it will look like when you start Regular Streaming:

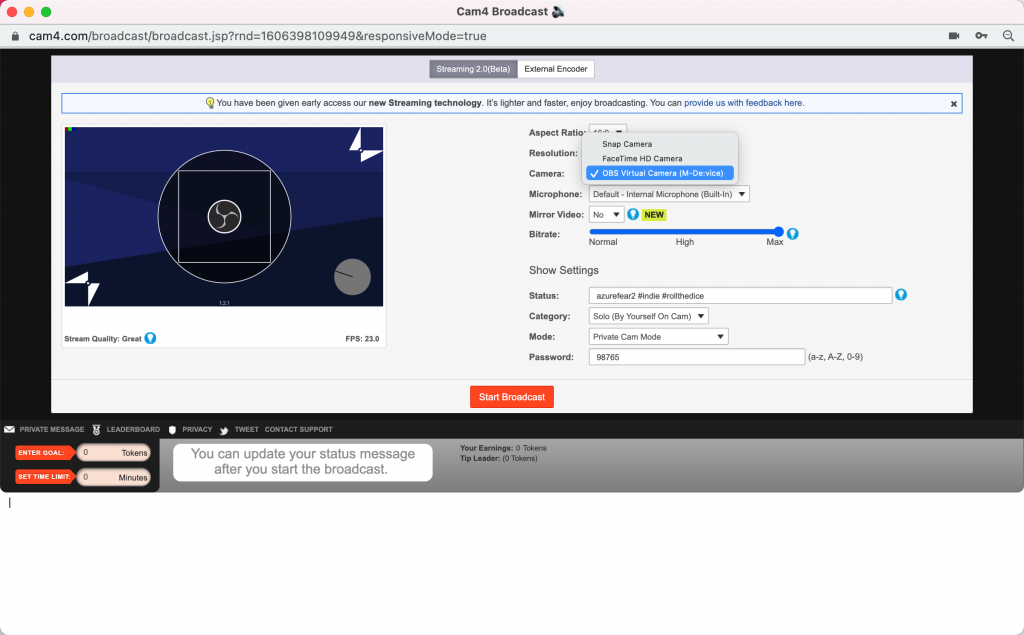
Step 3: Video / Audio Settings

It is important that you give permissions for CAM4 to use your video and your microphone. Once you give these permissions, CAM4 will detect your video and audio devices: 
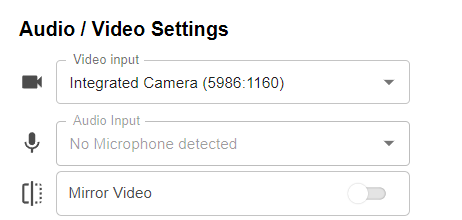
You don’t have to worry about the aspect ratio of your video. This will be chosen automatically, based on the ideal proportions for your hardware.

Usually you don’t have to tinker with these settings and CAM4 will detect the right devices automatically. But here you can select your preferred video and audio input if you wish, or choose to use an external encoder like OBS. 

You can flip your image horizontally by toggling Mirror video.

Step 4: Show Details

Underneath your audio and video  settings, you will find your show details:
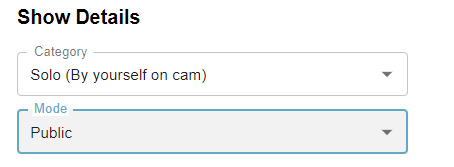
Category

Here you can select whether you will broadcast by yourself (Solo) or with another, verified user. Depending on your gender, you’ll be shown the options (Male-Female, Male-Male, or Female-Female). 

Select the appropriate category. 

Mode

By default this is set to public. If you are an approved CAM4 performer (2257/ID approved) then you can choose to have a password protected room. 

Step 5: Set your tags

Tags are a great way to communicate to potential viewers what to expect from your show. 

Choose tags that are appropriate to what your show is all about. This will make sure viewers will get to see what they want, and you get viewers that want to see what you want to show!

We recommend picking about 3 tags.

Step 6: Check your stream quality

Below the area where your video is shown, you’ll see information about your stream quality and FPS:

It’s useful to give these a quick glance before you start your broadcast, just to make sure that your video quality is to your viewers satisfaction.

Stream Quality
Indicates any stream issues so you can fix them before you start your broadcast. The light bulb shows troubleshooting suggestions.

FPS – Your cameras frames per second (FPS). 25-30 FPS is ideal.

When you see a low Stream quality and/or FPS, it may be worthwhile to do a speedtest and/or a reset of your router. 

Step 7: Go Live!

Once your settings are correct you can go live and start your show!


~That’s all for this lesson!

Happy Camming!

Love, Your Coaching Team!
 

Use C4Broadcaster on your Windows Browser

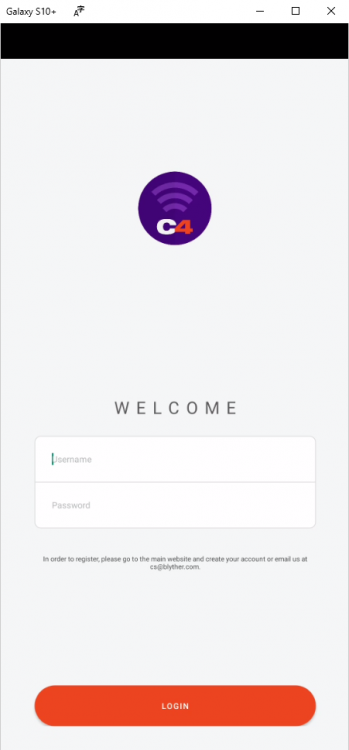
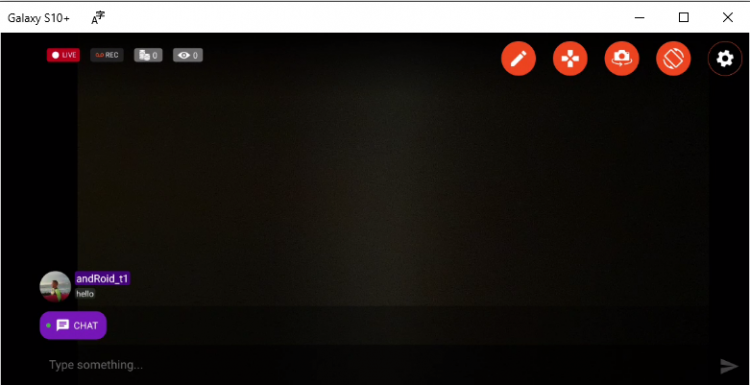
If you’re using both Windows on your computer and a Samsung device for streaming with C4Broadcaster, you can now mirror your phone through wi-fi and enjoy the app directly onto your PC.

REQUIREMENTS:
1. Windows 10
(running the Windows 10 May 2019 Update) 

2. Samsung device
(listed below in the supported devices list running Android 9.0 or above)

Follow these simple steps to set it up:

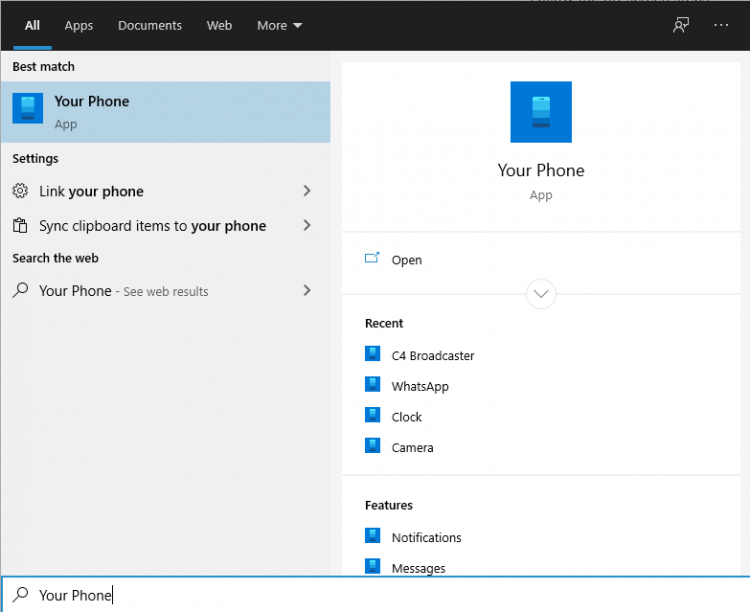
On your PC: Go to > Start and search for Your Phone
Windows 10 users with running the Windows 10 May 2019 Update will have the abillity to mirror their screen through wi-fi.

Log in with your Microsoft account in the application.
Follow the on-screen steps.

ON YOUR PHONE:

Check if the device you’re using is listed below as one of the supporting devices.

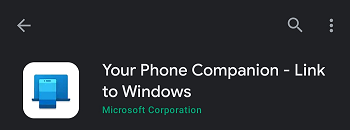
If yes, then check if you already have preinstalled on your Samsung device, “Your Phone Companion – Link to Windows” application. If not, it can be found on the Google Play Store and be downloaded from there.

Follow the on-screen steps

Make sure your phone and your PC are both connected to the same wi-fi network

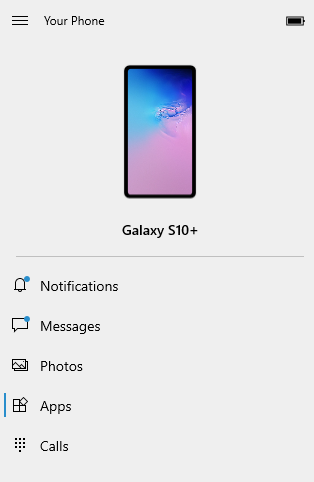
After the initial setup, you can access C4Broadcaster from the Apps button in the Your Phone menu.

Accept the request on your phone and voila, you can now use C4broadcaster on your PC.

The experience is the same as on mobile, you can switch the camera, rotate the device, play tipping games and apply image filters like you did when using solely your phone

SUPPORTED DEVICES:

Samsung Galaxy Fold
Samsung Galaxy Note20 5G
Samsung Galaxy Note20 Ultra 5G
Samsung Galaxy S20
Samsung Galaxy S20+
Samsung Galaxy S20 FE
Samsung Galaxy S20 Ultra
Samsung Galaxy XCover Pro
Samsung Galaxy Z Flip
Samsung Galaxy Z Flip 5G
Samsung Galaxy Z Fold2 5G
Samsung Galaxy A8s
Samsung Galaxy A30s
Samsung Galaxy A31
Samsung Galaxy A40
Samsung Galaxy A41
Samsung Galaxy A50
Samsung Galaxy A50s
Samsung Galaxy A51
Samsung Galaxy A51 5G
Samsung Galaxy A60
Samsung Galaxy A70
Samsung Galaxy A70s
Samsung Galaxy A71
Samsung Galaxy A71 5G
Samsung Galaxy A80
Samsung Galaxy A90s
Samsung Galaxy A90 5G
Samsung Galaxy Note9
Samsung Galaxy Note10
Samsung Galaxy Note10+
Samsung Galaxy Note10 Lite
Samsung Galaxy S9
Samsung Galaxy S9+
Samsung Galaxy S10
Samsung Galaxy S10+
Samsung Galaxy S10e
Samsung Galaxy S10 Lite


~That’s all for this lesson!

Happy Camming!
Love, Your Coaching Team!
Streaming 2.0 Troubleshooting

Can’t see or use your camera and microphone set up in CAM4

Streaming 2.0?

Please make sure that you are logged into Cam4 and can access
Streaming 2.0 tab in the Broadcast window

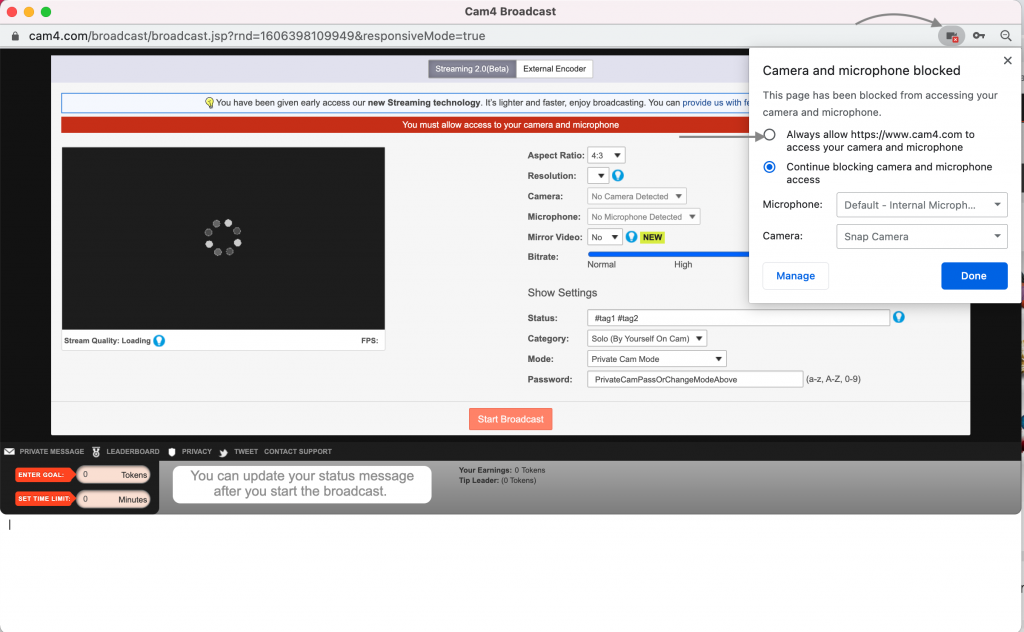
I get a message that my camera or microphone is disabled / No camera or microphone appears on my CAM4 Streaming 2.0 broadcast page.

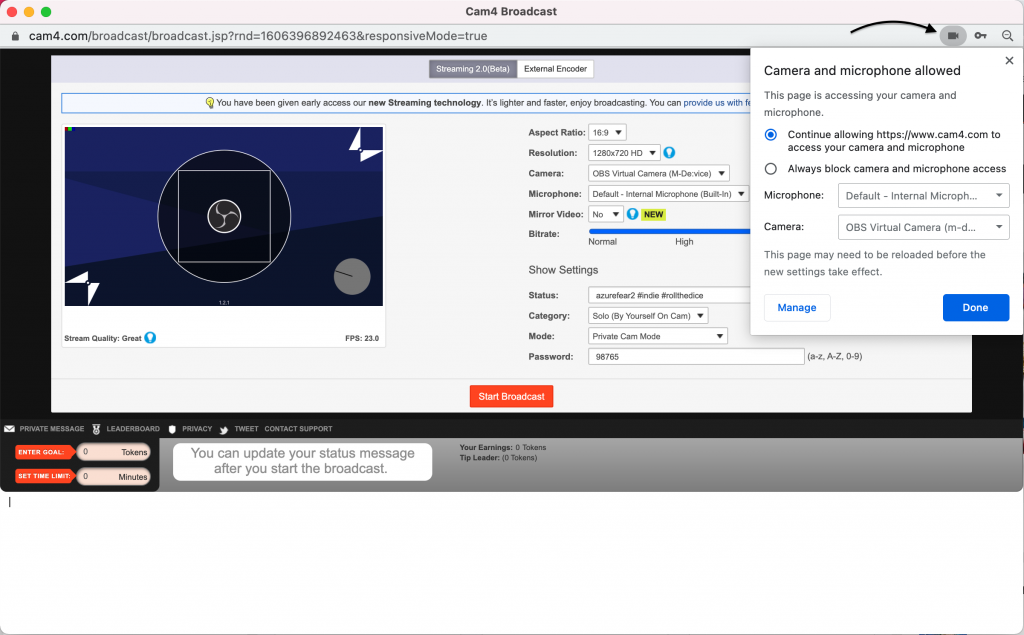
  • The camera and/or microphone are disabled in your browser. Please
    enable them by clicking the “Allow” button near the address/URL bar to allow cam access for the site – Select Continue allowing / Allow -> Done – and then refresh the page.
Allowing access to Cam and mic

or from browser settings

Please note: This may require a browser restart rather than just a page refresh as other tabs or browser windows may interfere with the change

Your camera and/or your microphone could be in use by another app. In many cases, your browser might not be able to access them directly if they are already in use. To fix this please close any other tabs/browsers or applications that are currently using your camera
( Tip: your camera in use indicator is lit before reaching the CAM4 website it generally indicates something else is using your cam.)


Problems streaming on more than one platform.

You may experience issues trying to broadcast on multiple platforms while using streaming 2.0.  If this is an issue you will need to create a virtual cam while only using one physical cam. The most common option would be to use the combination of OBS + OBs browser plugin. This will give you an additional cam in the dropdown list of an OBS virtual cam

    1. Install OBS Studio. It can be downloaded here, instructions for auto-configuration can be found here
    2. Install OBS Virtual cam based on your platform. WindowsMacLinuxPlease note for Windows this will require a system restart to complete the installation.
    3. Open OBS Studio
      • Select Tools / VirtualCam in the main OBS Studio window
      • Press the Start button, then close the dialog
      • Open your browser and choose OBS-Camera as your webcam.
      • You don’t need to press Start Streaming in OBS, but you need to have the proper settings for sources in OBS ( Camera and Microphone)
      • Start Streaming on CAM4 using Streaming 2.0 or External Encoder tab.

Open Broadcaster Software (OBS)

CAM4 is an official streaming platform on OBS! This means OBS will auto configure your exact setting needs for optimal streaming on CAM4.

Here’s how it works:


  1. Login to Cam4.com > Select Broadcast
  2. Select > External Encoder
  3. Select > Get Stream Key
  4. Highlight Stream Key and Copy key as it will be pasted into OBS
  5. Open > OBS
  6. Select > Tools. Then select > Auto Configuration Wizard
  7. Select > Optimize for streaming, recording is secondary
  8. Click > Next
  9. Base (Canvas) Resolution select: Use Current

** Base canvas = your primary monitor’s resolution**

  1. FPS: Select 30
  2. Click > Next
  3. Stream Type: Streaming Services
  4. Service: Cam4 (show all if Cam4 is not listed)
  5. Stream Key: (clear if populated; paste key previously copied from your Cam4 broadcast window)
  6. Estimate bitrate with bandwidth test: CHECKED
  7. Prefer Hardware Encoding (if an option): UNCHECKED
  8. Click > Next
  9. Stream Warning pop up box: Select YES and wait while settings are configured
  10. OBS then shows Final Results for your settings.

              Select Apply to use the new settings.

              Settings will not be applied if you select Cancel

Other Article to check out:

What Is External Encoding?

How Do I Improve My Broadcast Quality?

How To Use Lightstream Studio


~That’s all for this lesson!

Happy Camming!

Love, Your CAM4 Coaching TEAM

Auto Pause after a Private or Group Show

Auto-Pause is designed to give you time to prepare to be in front of your regular viewers again after your Private or Group show ends.

Go grab some food or something to drink, clean up, use the washroom, or change your outfit. You have 5 minutes to do whatever you need to do before going live on cam for your viewers again.

HOW DOES IT WORK?

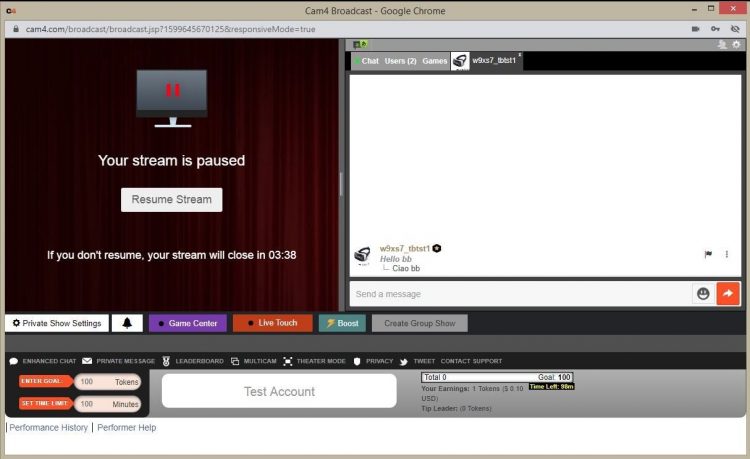
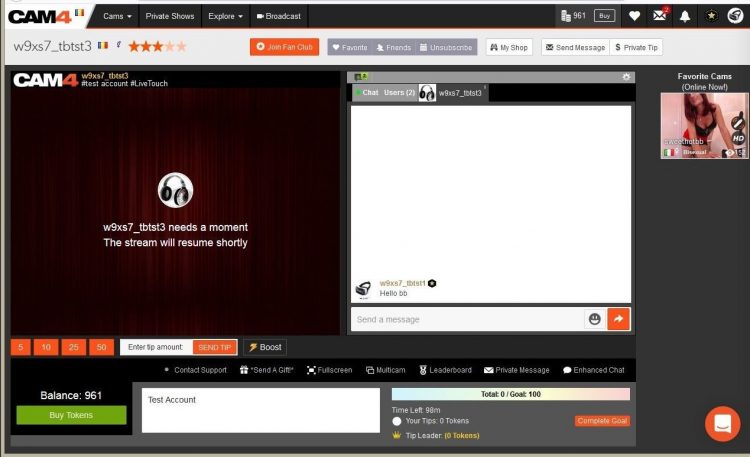
Start your Private or Group show as you normally would.  At the end of the show, your stream will pause for a maximum of 5 minutes .

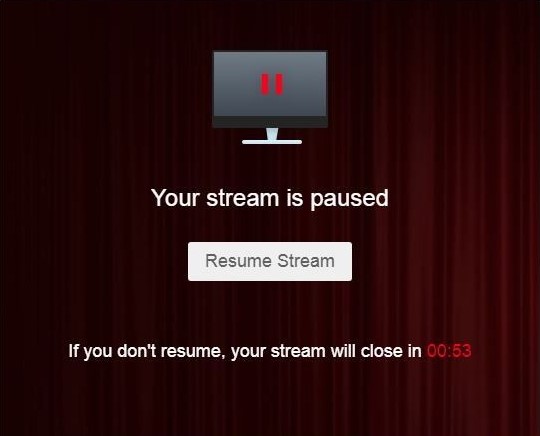
What YOU will see:


What your VIEWERS will see:

The stream is resumable at any time by clicking on the “Resume Stream” button. 

If you do not resume the stream during the first 5 minutes, the stream ends automatically. 

Private Show requests are not available while your show is paused. 

~That’s all for this lesson!

Happy Camming!
Love, Your Coaching Team!